Custom Docker networks on Unraid allow you to define explicit, isolated network topologies for your containers instead of relying on the default bridge. By creating your own custom docker networks, you gain control over IP assignment, routing behavior, inter‑container communication, and how containers interact with your LAN. This guide walks through the mechanics of creating and managing these networks on Unraid, explaining how they work under the hood and how to apply them cleanly in real‑world deployments.
IMPORTANT
You will need to temporarily turn docker services off to enable persistent custom networks if this feature is not already enabled.
Preparation
Enable Persistent Custom Networking
- Head to Settings > Docker within Unraid and set Enable Docker to No.
- Toggle to Advanced View and set your custom network type to macvlan if it is not already set to this
NOTE
Any custom network containers networks may be reset by this step if you have any containers setup with custom IP addresses
- Enable Preserve user defined networks, then reenable docker.
Now when we update/reboot/etc. our custom networks should be able to survive the journey.
Establishing Your Level of Segmentation
This section will vary based upon your use case. Within custom docker networks services are able to communicate without having to allocate ports out on your LAN address. Docker service are also able to reference one another via their respective container names as well. How segmented you want to get will determine how many custom docker networks you will need.
For me I stick to around 4 networks:
- techmedia : this serves as my media serving applications such as Dispatcharr, Jellyfin, Teamarr, Jellystat (and it’s respective db), AudioBookshelf, and gamethumbs.
- techdownload : this is primarily for media acquisition, so services like Radarr, Sonarr, Prowlarr, Jdownloader, Automatic Ripping Machine, FileFlows, and an Apprise service
- techvault: this hosts my more critical services like Vaultwarden and Zerobyte
- techweb : this is where generic web services will go that don’t fall into particular categories above
When it comes to choosing how segmented you want to get I’d ask yourself the following questions:
- How often to these services interact one another?
- Will these need both LAN and WAN access?
- How sensitive is the data the these containers process?
I find these categories for the most part fulfill a decent level of segmentation and allow for many of the containers that need to interact with one another, while also isolating them when possible (we will expand more on this later).
Let’s create some networks
To create a network we will have to do some light terminal work. Within Unraid click on the terminal icon inside your dashboard.
To create a network:
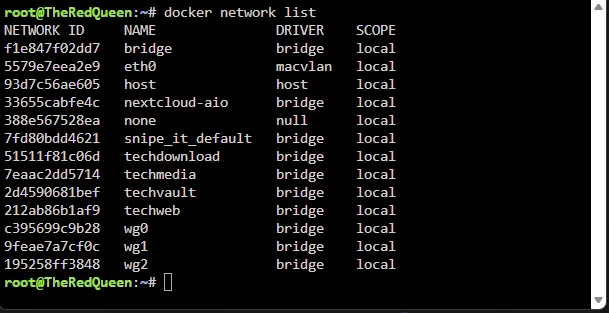
docker network create networknameTo list your list your networks:
docker network listTo delete a network:
docker network delete network nameNow let’s take a look back at our progress:
You should see your networks listed below (wire guard connections and docker compose stack networks will show up here as well.)
Execution
Configuring your containers
Now that we have some custom networks, let’s starting segmenting out our containers a little bit.
For this demonstration - I’m going to head over to my zerobyte container. From the dropdown I’m going to choose my desired network (techvault)

From there we will click apply. Now you’re probably thinking “that didn’t do much.” For the most part you’re correct. The real magic happens once we start chaining docker containers together. Let’s take another example - Vaultwarden:
![]() With Vaultwarden there’s a 99.9% chance that I’d never reach out to it via the LAN, so why do we need to let it occupy yet another port and broadcast out on our LAN? The great news is that we don’t have to at all. We can simply remove the port, and have our reverse proxy get to the container by keeping them on the same custom network. Let’s look at this now.
With Vaultwarden there’s a 99.9% chance that I’d never reach out to it via the LAN, so why do we need to let it occupy yet another port and broadcast out on our LAN? The great news is that we don’t have to at all. We can simply remove the port, and have our reverse proxy get to the container by keeping them on the same custom network. Let’s look at this now.
Vaultwarden’s default WebUI port is port 80 and we then typically set the port to whatever is free. Now - not every container will be the same in this regard. If you go for this next level of isolation I suggest noting down the container port (not the LAN IP: Port) for each of your containers you want to hide on your LAN as some containers may use a port like 8000, 8080, 443, etc. Let’s take a look at my reverse proxy to see this in action - it gets some special treatment compared to the others since it’s the primary point out to the WAN.


Within Zoraxy - since it’s connected to the techvault docker network. I can simply call the Vaultwarden container by name and it’ll connect to the container, we then put the typical webui port right next to the url so it knows which one to hit.
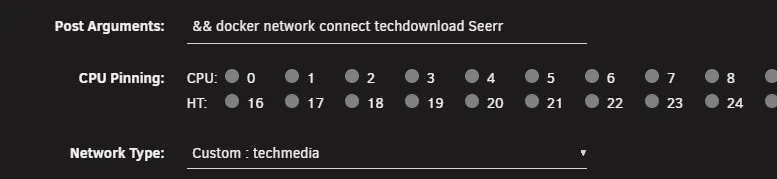
You’ll notice that my Reverse Proxy Container has more than one network connected to it - if you have a use case where a container needs to reach multiple docker networks. You can a network to the post arguments of a docker container with the following syntax:
&& docker network connect networkname containernameFor zoraxy since it’s in charge of exposing all of my services to the WAN - we will connect a fair few. This is what my post arguments look like for it.
&& docker network connect techmedia Zoraxy && docker network connect techvault Zoraxy && docker network connect techweb ZoraxyContainer names are case sensitive and make sure in your post arguments that you don’t connect the network that’s already selected in network type, or your container will likely fail to start.
Scenarios
Let’s go over some sample scenarios in the lab where containers may need to hop containers.
Network Setup:
- techdownload network
- Seer
- Radarr
- Sonarr
- qBitorrent
- Prowlarr
- techmedia network
- Jellyfin
- Dispatcharr
- Teamarr
- JellyStat We’ve got a handful of containers here, but their level of access requirements will differ on each level.
Container Communication between the same network
For Sonarr/Radarr - they’ll need access to only indexers and download clients network wise, so they won’t need any additional reaching points. We can simply setup the indexers to use http://prowlarr:9696 as the base URL inside Radarr and Sonarr and they’ll all only communicate over that custom network. If I were using the Jellyfin Connect options in either application. I’d had to open them up to the techmedia network, but since I don’t we will skip this.
Container Communication between multiple docker networks
Now let’s take something like Seer - in order to facilitate requests, it’ll need access to both networks so it can contact Radarr/Sonarr to add the request, then Jellyfin in order to check when the media is available and to authenticate Jellyfin logins since our logins are the same across both services. To configure this we will just edit the container, and since I’ve already got Seer in the techmedia network, all we have to do is add a command to add it into the techdownload network.
After we apply our changes, the docker will have two internal IPs and can communicate with Radarr, Sonarr, and Jellyfin. Since this also has little need to be accessible on the LAN. There’s not much point in keeping the port passthrough in place, so we will remove that and restart the container.
When to remove LAN IP port passthroughs and when not to.
Now Jellyfin, it’s a little bit different, we wouldn’t always want it going out to the WAN in order to grab data, so in that case we’d leave all the ports as they are so that when people are on the LAN, we can utilize that to reduce WAN traffic and potential bottlenecking. Same thing with Dispatcharr since UI access on the LAN is quite common and isn’t exposed directly to the WAN since its feeds are handed off to Jellyfin.
However since they are on the same network - instead of using the IP. This reduces latency and prevents the traffic from needing to go out to LAN whenever it’s not needed. We can also utilize a similar strategy with Teamarr and Gamethumbs since they feed data back to Dispatcharr.

Conclusion
Custom Docker networks on Unraid give you something the default bridge setup never truly could. By carving your containers into purpose‑built network segments, you gain tighter control over how services communicate, how they’re exposed, and how much of your LAN that containers actually need to touch. The end result is a system that’s cleaner, quieter, and far more secure. Once you’re used to looking at it - it also serves as an easier way of seeing just what each container needs access to.